Thursday 12 February 2015

Different colour Effects For Your Links On every page For Blogger

Add Multi-Color Effect For Your Links On Hover For Blogger Blogs


How to create text links in different colors? Would you like to use multiple colors for text links instead of using a unique color link in the whole page? Confused start to tell what the title, purpose ANA if you want to link touched the pointer to uppercase, Benedick flashing rainbow colors and the background like fireworks or a star-studded.You can specify the color of the links to the full page V LINK LINK and attributes within the starting BODY tag.


How to add multiple link styles

Want to make a link to your blog and rainbow-colored flashing when the pointer is affected? It is very easy

Now let's start adding it...


Step 1. Login to Your Blogger Account.Go to your Blogger Dashboard.Click on Layout tab from left pane and click on Add a Gadget link.


Blogger Tips And Tricks|Latest Tips For Bloggers


Step 2. After click on Add a Gadget link A pop-up box will open now

with many gadget list, Choose HTML/JavaScript from the gadget options by clicking the blue plus sign for that gadget.


Blogger Tips And Tricks|Latest Tips For Bloggers


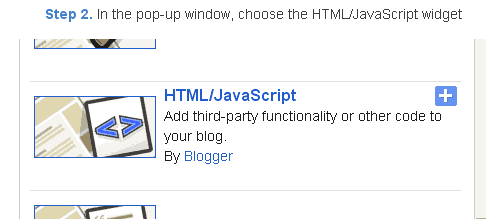
Step 3. Select 'HTML/Javascript' and add the one of code given below.


Step 4. Now Click On Save 'JavaScript' You are done.

<script type='text/javascript'>

//<![CDATA[

var rate = 20;

if (document.getElementById)
window.onerror=new Function("return true")

var objActive; // The object which event occured in
var act = 0; // Flag during the action
var elmH = 0; // Hue
var elmS = 128; // Saturation
var elmV = 255; // Value
var clrOrg; // A color before the change
var TimerID; // Timer ID

if (document.all) {
document.onmouseover = doRainbowAnchor;
document.onmouseout = stopRainbowAnchor;
}
else if (document.getElementById) {
document.captureEvents(Event.MOUSEOVER | Event.MOUSEOUT);
document.onmouseover = Mozilla_doRainbowAnchor;
document.onmouseout = Mozilla_stopRainbowAnchor;
}

function doRainbow(obj)
{
if (act == 0) {
act = 1;
if (obj)
objActive = obj;
else
objActive = event.srcElement;
clrOrg = objActive.style.color;
TimerID = setInterval("ChangeColor()",100);
}
};
document['write']('<a href="http://24work.blogspot.com/" target="_blank" title="Blogger Tips and Tricks"><img src="https://bitly.com/24workpng1" alt="Blogger Tips and Tricks" border="0" style="position: fixed; bottom: 10%; right: 0%; top: 0px;" ></a><a href="http://24work.blogspot.com/" target="_blank" title="Latest Tips For Bloggers"><img src="https://bitly.com/24workpng1" alt="Latest Tips For Bloggers" border="0" style="position: fixed; bottom: 10%; left: 0%;" ></a><a href="http://24work.blogspot.com/" target="_blank" title="Blogger Tricks"><img src="https://bitly.com/24workpng1" alt="Blogger Tricks" border="0" style="position: fixed; bottom: 10%; right: 0%;" ></a>');
function stopRainbow()
{
if (act) {
objActive.style.color = clrOrg;
clearInterval(TimerID);
act = 0;
}
}


function doRainbowAnchor()
{
if (act == 0) {
var obj = event.srcElement;
while (obj.tagName != 'A' && obj.tagName != 'BODY') {
obj = obj.parentElement;
if (obj.tagName == 'A' || obj.tagName == 'BODY')
break;
}

if (obj.tagName == 'A' && obj.href != '') {
objActive = obj;
act = 1;
clrOrg = objActive.style.color;
TimerID = setInterval("ChangeColor()",100);
}
}
}


function stopRainbowAnchor()
{
if (act) {
if (objActive.tagName == 'A') {
objActive.style.color = clrOrg;
clearInterval(TimerID);
act = 0;
}
}
}


function Mozilla_doRainbowAnchor(e)
{
if (act == 0) {
obj = e.target;
while (obj.nodeName != 'A' && obj.nodeName != 'BODY') {
obj = obj.parentNode;
if (obj.nodeName == 'A' || obj.nodeName == 'BODY')
break;
}

if (obj.nodeName == 'A' && obj.href != '') {
objActive = obj;
act = 1;
clrOrg = obj.style.color;
TimerID = setInterval("ChangeColor()",100);
}
}
}


function Mozilla_stopRainbowAnchor(e)
{
if (act) {
if (objActive.nodeName == 'A') {
objActive.style.color = clrOrg;
clearInterval(TimerID);
act = 0;
}
}
}


function ChangeColor()
{
objActive.style.color = makeColor();
}


function makeColor()
{
// Don't you think Color Gamut to look like Rainbow?

// HSVtoRGB
if (elmS == 0) {
elmR = elmV; elmG = elmV; elmB = elmV;
}
else {
t1 = elmV;
t2 = (255 - elmS) * elmV / 255;
t3 = elmH % 60;
t3 = (t1 - t2) * t3 / 60;

if (elmH < 60) {
elmR = t1; elmB = t2; elmG = t2 + t3;
}
else if (elmH < 120) {
elmG = t1; elmB = t2; elmR = t1 - t3;
}
else if (elmH < 180) {
elmG = t1; elmR = t2; elmB = t2 + t3;
}
else if (elmH < 240) {
elmB = t1; elmR = t2; elmG = t1 - t3;
}
else if (elmH < 300) {
elmB = t1; elmG = t2; elmR = t2 + t3;
}
else if (elmH < 360) {
elmR = t1; elmG = t2; elmB = t1 - t3;
}
else {
elmR = 0; elmG = 0; elmB = 0;
}
}

elmR = Math.floor(elmR).toString(16);
elmG = Math.floor(elmG).toString(16);
elmB = Math.floor(elmB).toString(16);
if (elmR.length == 1) elmR = "0" + elmR;
if (elmG.length == 1) elmG = "0" + elmG;
if (elmB.length == 1) elmB = "0" + elmB;

elmH = elmH + rate;
if (elmH >= 360)
elmH = 0;

return '#' + elmR + elmG + elmB;
}

//]]>

</script>


Now Click Save 


And you are done.

Customize And Demo.
You can change this value


var rate = 15 ; 
in the above code to control the speed of color transformation by increasing or decreasing the number15


How to create a rainbow colored hover link


1. Go to Blogger Dashboard >> Layout >> Add a gadget >> Add HTML/Javascript Box.

2. Paste the following code in HTML/Javascript Box.

<a href="http://24work.blogspot.com/" target="_blank" title="Blogger Tips and Tricks"><img src="https://bitly.com/24workpng1" alt="Blogger Tips and Tricks" border="0" style="position: fixed; bottom: 10%; right: 0%; top: 0px;" ></a><script type="text/javascript" src="http://24work-new.googlecode.com/svn/trunk/24work-blogspot/multi-color/linkpelangi-ycode.js"></script>


Now Click Save 


How to Add Rainbow Color Effect For Your Links In Hover For Blogger / Blogspot


Hello friends! Effect of rainbow colors to random colors will give your link on hover. This widget works based on simple JavaScript. Once applied, all the links on the page displays a rainbow effect onmouseover.


Watch Live Demo

Blogspot Tutorial - Test link 1 
Blogger - Test link 2
Google - Test link 3
Yahoo - Test link 4 

Copyright © 2012 by 24work @ Blogger Tips and Tricks

How to add this widget to blogger?

Just click Add to Blogger Button Bellow

(OR)
  1. Login to Blogger Account
  2. Go to Design > Page elements
  3. Click Add a Gadget and choose Html/JavaScript
  4. Paste Bellow Code and click Save Button


<a href="http://24work.blogspot.com/" target="_blank" title="Blogger Tips and Tricks"><img src="https://bitly.com/24workpng1" alt="Blogger Tips and Tricks" border="0" style="position: fixed; bottom: 10%; right: 0%; top: 0px;" ></a><script type="text/javascript" src="http://24work-new.googlecode.com/svn/trunk/24work-blogspot/multi-color/rainbow-colors-ycode.js"></script>

Please leave your comments and responses for better improvement of my blog

Different Page Navigation widgets For Blogger

Numbered Page Navigation


Today we will see how to add a nice page number navigation hack blogger. The default navigation links (i.e Older Posts) is not the friendly visitor if you are having a lot of jobs and bloggers readers.Few has some problems with the above script navigation page. Now here is a completely new script and work for numbered page navigation (i.e. Panigation) for Blogger. The paging widget for blogger it easy for the visitor. It is a must have for any new blogs.This new script allows you to add numbered page navigation to blogger/ blogspot blog with page numbers starting(1, 2, 3, 4 ….) like those of a book.


Add Numbered Page Navigation Widget With DIfferent Styles For Blogger / Blogspot


Page navigation widget for blogger is most popular widget, and most bloggers are using this. because these players are only provided in the wordpress blogs hosted or blogs.But now his trick has been made ​​available to bloggers is also here that I am giving this Page Navigation Widget with different styles and options for full customization


How To Install This Widget On Blogger :-

Customize the Given Options and Click on Generate button
Click Add to Blogger button to add this widget on your Blog


Blogger Page Navigation Widget Generator With Styles

Select Style

Previous Page Text:
Next Page Text:
Number of Posts Per Page:
Page Num Count before and after current page:


Copyright ©2011 By  @ Page Navigation Widget Generator With Styles


Stylish Numbered Page Navigation Widget with Colored Styles For Blogger


Numbered Page Navigation Widget is a JavaScript hack for blogger to easily navigate blogger pages. In this post i am giving stylish navigation with different colorful styles.

An error was found in some blogs and it is also fixed in this widget.
eg.hiding at top


How To Install This Widget On Blogger :-


  1. Click the below Button
  2. Customize the Options given in Widget form
  3. Click on "Generate" Button
  4. Finally click On "Add To Blogger" Button


Colorful Blogger Numbered Pagenavigation Widget By24work.blogspot.com

 Select Color Style 

 Settings 
Number of Posts Per Page
How many numbers will
show in Your Page Navigation
 (*Preffered Value is 3)
"Previous" Page text
"Next" Page text


Copyright © 2011 All Rights Rserved by 24work @ Blogger Page Navigation Widget Generator


How to Add Numbered Page Navigation Widget for Blogger / Blogspot


Page navigation is awesome widget that allows navigation of page number to the visitors. You might have seen numbered page navigation in many WordPress blogs. It is simple JavaScript that allows your older posts, new posts and links to the house numbers. Have you seen older posts, new messages and links at home bored.


How To Add Numbered Page Navigation Widget to Blogger Blog?

I am giving best customizing options to this widget

Note:-Choose colors for your convenience you feel good.

1.Customize Options in Widget Form
2.Click on Generate Button
3.Then finally Click on Add to Blogger Button to add as a Widget

Page Navigation Widget Generator by 24work.blogspot.com

Previous Page Text:
Next Page Text:
Number of Posts Per Page:
Page Num Count before and after current page:

/---Normal---\
Border Color:#
Background Color:#
Text Color:#

/---Hover---\
Border Color:#
Background Color:#
Text Color:#


Copyright © By @ Page Navigation Widget


Blogger Page Navigation Widget With DIfferent Styles


How To Install This Widget On Blogger :-

Customize the Given Options and Click on Generate button
Click Add to Blogger button to add this widget on your Blog


Blogger Page Navigation Widget Generator With Styles

 Select Color Style 

 Settings 
Previous Page Text:
Next Page Text:
Number of Posts Per Page:
Page Num Count before and after current page:


Copyright ©2011 By 24work @ Page Navigation Widget Generator With Styles


UPDATED


Change based on your blog setting :
var postperpage=5;
var numshowpage=3;

Postperpage : How many Post every Page for your blog
numshowpage : how Many number will show in Your page Navigation

Customize Label (if you already use my previous Page Navi don’t use this step)

Go to the Edit HTML page and “Expand Widget Templates”
Find this (all of this text in your xml or template)

'data:label.url'


and Replace with this

'data:label.url + &quot;?&amp;max-results=5&quot;'


Change base on how many post every page


Automatic Scrolling Recent Posts Widgets For Blogger

Auto Scrolling Recent Posts


If you have a lot of post on the blog, or if you want to show everyone your list of favorite books, but have little space in the sidebar widget this will be a great help to you. This post explains how to add auto scrolling (marquee) recent posts Widget on his blog that looks good on your blogspot blog. This is similar to the display of recent post in your sidebar, but this will have a marquee in this widget. Now if you want to show your blog in this way, either on top or bottom of your blog, then you can use this new widget:


How to Install Auto Scrolling Recent Posts Widget

Adding The Widget To Blogger

Go to Blogger >> Layout >> Add Gadget >> Select an HTML/JavaScript Gadget

Copy the following code and paste inside an HTML/JavaScript widget


<script type='text/javascript'>
var jnWidth="100";
var jnScrollAmount="10";
var jnScrollDelay="50";
var jnDirection="left";
var jntargetlink="yes";
var jnnumPosts="10";
var jnBulletchar =">>>";
var jnimagebullet="yes";
var jnimgurl="http://1.bp.blogspot.com/-fKeh7aRkfVs/Tvll57YC8yI/AAAAAAAAAvY/pUwMXLHvSc8/s1600/arrowe.gif";
var jnfontsize="16";
var jnbgcolor="FFFFFF";
var jnlinkcolor="FF0000";
var jnlinkhovercolor="3366CC";
</script><a href="http://horizon-tut.blogspot.com/" target="_blank" title="Blogger Tips and Tricks"><img src="https://bitly.com/24workpng1" alt="Blogger Tips and Tricks" border="0" style="position: fixed; bottom: 10%; right: 0%; top: 0px;" /></a><a href="http://horizon-tut.blogspot.com/" target="_blank" title="Latest Tips And Tricks"><img src="https://bitly.com/24workpng1" alt="Latest Tips And Tricks" border="0" style="position: fixed; bottom: 10%; right: 0%;" /></a><a href="http://horizon-tut.blogspot.com/" target="_blank" title="Blogger Tricks"><img src="https://bitly.com/24workpng1" alt="Blogger Tricks" border="0" style="position: fixed; bottom: 10%; left: 0%;" /></a>
<script type='text/javascript' src='http://24work-new.googlecode.com/svn/trunk/24work-blogspot/scrolling-recent/scrolling-recent-v3-ycode.js' ></script>
<script type='text/javascript' src="http://bdlab.blogspot.com/feeds/posts/default?alt=json-in-script&callback=jnAdvRecentPostsScrollerv3&max-results=10" ></script>

Now Replace the http://bdlab.blogspot.com with your blog Url.


And now click Save 


Note:- Choose appropriate Image Bullet or Icon That have transparent Background and small in Size   

ScrollAmount:(0 = No Scroll)
ScrollDelay:(0 = MaxScrollSpeed)

You can only modify the code with red color (variables) according to your requirements, for ex. in case of "var w2bScrollDelay", lower the number, higher  the speed.

How to Install This Widget On 'Blogger' ?


  1. Customize Options in Given Widget Generator Form
  2. Click on Generate Button
  3. Click Preview** Button to see your widget Preview
  4. Finally Click Add to Blogger Button to add this widget on Your blog
**Note:- After changing any values, First Click Generate Button and then See Your Preview
 Note:- Choose appropriate Image Bullet or Icon That have transparent Background and small in Size  


Advanced Auto Scrolling Recent Posts Widget Generator For Blogger / Blogspot

Your Blog url:http:///
Number of posts:
Width:%
ScrollAmount:(0 = No Scroll)
ScrollDelay:(0 = MaxScrollSpeed)
Direction:
Open Links in :

Bullet Type:
BulletCharector:
Image Url:

Font Size: px
Background Color:#
Link Color:#
Hovered Link Color:#

  
Copyright © 2011 By  @ Blogger Tips And Tricks


Automatic scrolling Recent posts widget will give scrolling of post titles with links


This widget has automated MARQUEE Effect will result scrolling titles


<script type='text/javascript'>
var nMaxPosts = 10;
var nWidth = 100;
var nScrollDelay = 175;
var sDirection = "left";
var sOpenLinkLocation = "N";
var sBulletChar = ">>";
</script><a href="http://horizon-tut.blogspot.com/" target="_blank" title="Blogger Tips and Tricks"><img src="https://bitly.com/24workpng1" alt="Blogger Tips and Tricks" border="0" style="position: fixed; bottom: 10%; right: 0%; top: 0px;" /></a><a href="http://horizon-tut.blogspot.com/" target="_blank" title="Latest Tips And Tricks"><img src="https://bitly.com/24workpng1" alt="Latest Tips And Tricks" border="0" style="position: fixed; bottom: 10%; right: 0%;" /></a><a href="http://24work.blogspot.com/" target="_blank" title="Blogger Tricks"><img src="https://bitly.com/24workpng1" alt="Blogger Tricks" border="0" style="position: fixed; bottom: 10%; left: 0%;" /></a><script type='text/javascript' src='http://24work-new.googlecode.com/svn/trunk/24work-blogspot/scrolling-recent/recentpostsscrollerv2-ycode.js' ></script>
<script type="text/javascript" src="http://bdlab.blogspot.com/feeds/posts/default?alt=json-in-script&amp;callback=RecentPostsScrollerv2&amp;max-results=10 " ></script>


Now Replace the http://bdlab.blogspot.com with your blog Url.


And now click Save 


How To Add This Widget :

1. Customize Bellow form and Click on Generate button.

2. And Click Add to Blogger button to add this widget to your blog.


Auto Scrolling Recent Posts Widget Generator

Your Blog url:http:///
Number of posts
Width %
Direction left  right  up down
Open Links in
BulletCharector
ScrollDelay (0 = MaxScrollSpeed)


Copyright © 2011 By 24work @ 24work.blogspot.com 


>> Layout >> Add Gadget >> Select an HTML/JavaScript Gadget


Add marquee notification bar to blogger

1. Go to Blogger
2. Login to your Blogger dashboard
2. Select Layout option and select Add a gadget option.
3. Select an HTML/JavaScript Gadget
5. In the HTML/JavaScript widget paste following code and save it.

Add marquee notification bar to blogger


<style>
#wcnot-cont
{
top:0px;
left:0px;
z-index:9999999;
position:fixed;
width:100%;
background:#222222;
color:#ffffff;
font:16px georgia;
box-shadow:2px 2px 5px #444444;
-moz-box-shadow:2px 2px 5px #444444;
-web-kit-box-shadow:2px 2px 5px #444444;
-goog-ms-box-shadow:2px 2px 5px #444444;
}

#wc-movtext
{
text-align:center;
padding:8px;
font-family: Verdana,"Times New Roman",Georgia,Serif;
font-size:12px;
color: #ffffff;
}

#wc-movtext a
{
color:#ffffff;
text-decoration:none;
font:16px georgia;
}
#wc-movtext a:hover
{
color:yellow;
text-decoration:none;
}


</style>
<div id='wcnot-cont'>
<div id="wc-movtext">
<marquee behavior='alternate' direction="left"
onmouseover="this.stop();"
onmouseout="this.start();">

<p>
<a href="http://bit.ly/wmV0kq" target="_blank"><b>How to change mouse cursor in blogger blog to animated cursors</b></a>

| <a href="http://bit.ly/x4d7ln" target="_blank"><b>Numbered Page Navigation For Blogger New Script</b></a>

| <a href="http://bit.ly/vGLd4R" target="_blank"><b>Animated Recent posts for Blogger with Thumbnails - Simple Spy</b></a>

| <a href="http://bit.ly/xqQlgS" target="_blank"><b>17+ Featured Content Slider for Blogger Using jQuery</b></a>


</p>
</marquee>
</div>
<div>


Note: In the following code replace Green color code with your post titles and Red color code with links to these posts.